Improving BBC micro:bit's Tug-of-LED Exercise Part 1: Audio

Makecode's Tug-of-LED exercise guides your students to create a game of tug-of-war on their micro:bits. The exercise-as-written teaches your students about rounding numbers and conditional logic. We can add some polish to the gameplay experience while at the same time teaching concepts like arrays, and audio frequency. After completing the original tutorial, the students will be able to play a two-player game on a single micro:bit, one player per button. When they finish our improvements, they'll play wirelessly and with sound and improved graphics.
Mapping Game State to Sound
In Tug-of-LED, a single LED lights up on the micro:bit's 5x5 display, indicating the position of the "knot" or the "flag" in a game of tug-of-war. Our first goal is to play an audio tone through the micro:bit v2's speakers depending on the state of the game score. If the score is lower (meaning, team A is winning), we want to play a lower tone. If the score is higher, (meaning, team B is winning), we want to play a higher tone.
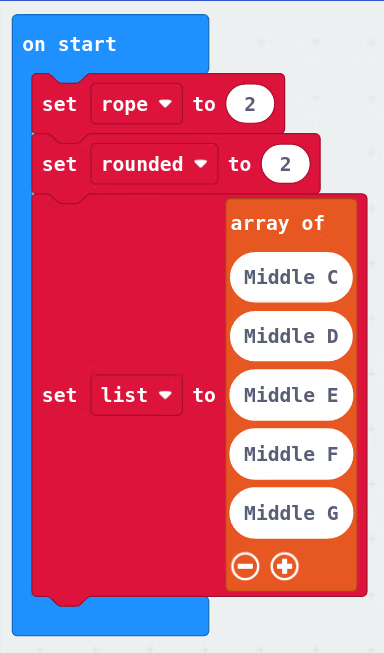
Let's start by creating a new variable called rounded which will store the rounded rope value. After that, create a new array by dragging in the set list to array of "0", "1" block. Add three positions to the array to make five in total. These five positions represent the five possible game states while in play:
[
  0, // The knot is one spot away from team A's finish line
  1, // The knot is two spots away from team A's finish line
  2, // The knot is in the middle of the field
  3, // The knot is two spots away from team B's finish line
  4, // The knot is one spot away from team B's finish line
]
We'll use this array to store the musical tones we'd like to play whenever the score changes. Since the score is represented as a number from 0 to 4, we can represent the choice of sound to play as an array of 5 items.
From the Music category, drag the Middle C onto the first slot of the array. Duplicate it, and drag the copy onto the second slot, and so-on until the array is full of musical notes, then change the notes to range from Middle C to Middle G:
Functions as Procedures
The next thing we're going to do it wrap up our drawing code in a function, called draw. The draw function will be what's called a procedure, meaning a list of code statements, to be executed one by one, whenever the draw procedure is "called" or "executed". From the Functions category, choose Make a function, do not click on Add a parameter (if you do, click the X, then start again from Make a function), and change the name from doSomething to draw.
Move the contents of the forever loop into the draw function's body, then drag call draw from the functions category into the forever loop, to restore the functionality.
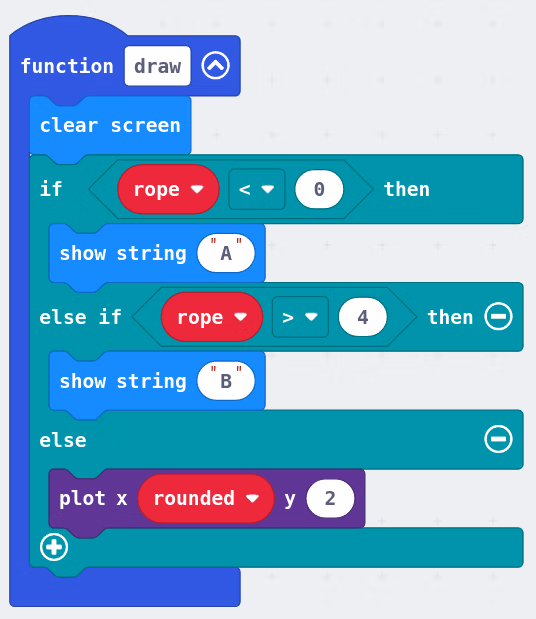
Notice that we slightly modified the original tutorial's version of this code - ours uses the rounded variable, and only plots the LED if one team or the other has not yet won.
While we're here, make sure to add call draw at the bottom of our on start block, so that something appears on screen at the start of the game.
Updating the Game
The original example used a while loop to constantly update the game state. Using our newfound understanding of functions we can score a minor optimization by only running that code when the user presses a button. Create a new function called updateScoreBy, and give it a single number as a parameter. In that block, set a new variable called last to the value of rounded, then change rope by num (by the parameter passed in), then set rounded to round(rope). After all that, call draw to update the screen.
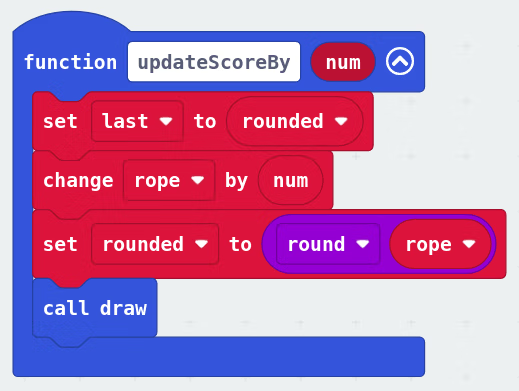
The reason we're bothering to save the last value of rounded before updating it and drawing the screen is for the next step, playing the audio. Change the contents of our on button pressed blocks to call our updateScoreBy function instead:

Now that we've accomplished that, let's delete our forever loop, since we now only update the screen when a button is pressed.
Audio Processing
Our last step for this tutorial will be to play the correct musical tone whenever the score changes, but we have a problem. The micro:bit v2 is capable of playing sounds "in the background", i.e. starting playback but then immediately moving on to the next statement even before playback finishes. However, it is only able to do this with special SoundEffect objects, not with the musical notes we added to our array earlier. Those notes are actually just numbers; for example, "Middle C" is actually the number 262, representing an audio pulse with a frequency of 262Hz.
Explain to your students how frequency gives rise to tone, perhaps with the example of a bumblebee's wings, which beat at a frequency between 105 and 205Hz. We'll use the frequency number in our array to create a SoundEffect.
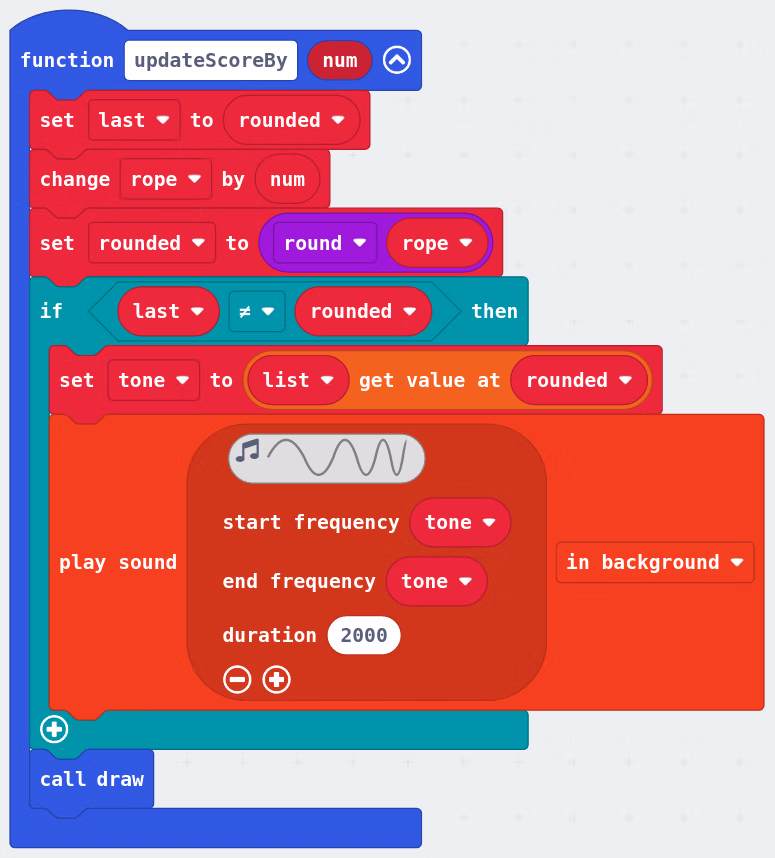
Drag in an if block and a ≠ comparison, and set the predicate of the if block to if last != rounded. This way, we'll only play the tone when the score changes by whole numbers. Then, drag the Play sound until done block down onto the workspace, and change the timing from until done to in background.
Create a new variable called tone or frequency and set it in the if block to the list value at rounded. In this way, we'll play the frequency which corresponds to the current score.
Press the + to expand the sound effect block, and set the start and end frequency tones to tone. Set the duration to 2000 milliseconds. You can adjust this duration to suit your taste afterwards. Now, drag that whole if block into our updateScoreBy function, just before the call draw block, so that the sound plays whenever the score updates.
Demo
Take a look at the completed project here:
In our next lesson, we'll work on making the game wireless and using gestures instead of buttons.
Can you think of any improvements to this code? Let me know in the comments on mastodon!